Alongside the option of training your model, TensorflowJs also comes with its own predefined models.
One of the easiest to use pre-trained models in TensorflowJs is the BERT Question and Answer model.
Using it we will build a simple app where we can ask questions on a given text and we will get back answers. See the below video:
Let's get to work!
Loading the Question and Answer TensorflowJs model
The first step will be to import the TensorflowJs qna model to our app:
<!-- Load TensorFlow.js. This is required to use the qna model. -->
<script src="https://cdn.jsdelivr.net/npm/@tensorflow/tfjs"> </script>

<!-- Load the qna model. -->
<script src="https://cdn.jsdelivr.net/npm/@tensorflow-models/qna"> </script>
Keep in mind that we will also need to load the actual TensorFlow library to use the model.
After the import, we will need to load the asynchronous the qna model:
const enableUi = (model)=> {
    // enable the UI and use the model here
}

qna.load().then(enableUi)
Setting up the app's markup
The markup of the app contains the input for the questions, the submit button, and a placeholder for the text that will serve as the basis for the answers.
<input />
<button disabled>Find answer</button>
<div class="js-story story">
  Marco Polo was a Venetian ...
</div>
Given that we cannot do anything until the qna model is fully loaded we will first start with the submit question button disabled and will later activate it.
We will also need an eventListener that will read the question from the text input:
const articleText = document.querySelector('.js-story').textContent
const input = document.querySelector('input')
const button = document.querySelector('button')
let model

const enableUi = (model)=> {
  button.disabled = false
  button.addEventListener('click', () => {
    let question = input.value
    // answer the questions here
  })
}

qna.load().then(enableUi)
Using the TensorflowJs qna model to answer questions
Using the BERT Question and Answer model is pretty straightforward. It just has the findAnswers() method:
await model.findAnswers(question, text)In order to integrate it with our example we will call it with the content of the .js-story div and with what the user wrote in the question text input.
For the initial step, we will just console log the answer.
const showAnswers = (answers) => {
  console.log('Answers: ', answers)
}

const enableUi = (model)=> {
  button.disabled = false
  button.addEventListener('click', () => {
    let question = input.value
    // answer the questions here
  })
}
At this point, if we search for something like "Where was Marco Polo born?" we will get an array of objects like the one below:
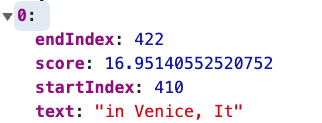
The array is ordered by the score attribute. This score number, indicates the confidence level of an answer. The bigger, the better.
Alongside the score attribute we also have access to the startIndex and endIndex pointing to where the answer was found.
Keep in mind that this is not just a search-for-text problem. For example, if we ask "Who was the Mongol ruler?" we will get the below answer:

Note that the word "ruler" does not appear in the text.
Highlighting the answers in the main text
The final step is to highlight the answers in the main text. This one is just a cosmetic feature.
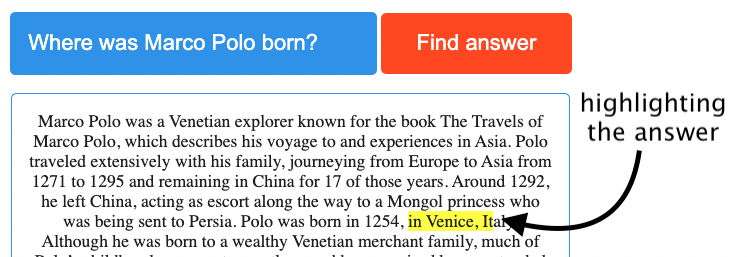
We will take the first answer (if any) and using the startIndex and endIndex we will add a highlight class with a yellow background to that part of the text:
const showAnswers = (answers) => {
  console.log('Answers: ', answers)
  let start = answers[0].startIndex
  let end = answers[0].endIndex
  let highlightedText = articleText.substring(0,start) + "<span class='highlight'>" + articleText.substring(start,end+1) + "</span>" + articleText.substring(end + 1)
  document.querySelector('.js-story').innerHTML = highlightedText
}
And that's it! You can check out the full code in this codepen.
Happy machine learning!
📖 50 Javascript, React and NextJs Projects
Learn by doing with this FREE ebook! Not sure what to build? Dive in with 50 projects with project briefs and wireframes! Choose from 8 project categories and get started right away.
📖 50 Javascript, React and NextJs Projects
Learn by doing with this FREE ebook! Not sure what to build? Dive in with 50 projects with project briefs and wireframes! Choose from 8 project categories and get started right away.