If you are in the React world there are some pretty high chances you may have heard about Mobx. Mobx is a lightweight and easy to learn state management library developed by Michel Weststrate.
Its 4th version was released a few weeks ago and it comes with a lot of new cool features.
We will start our journey in the Mobx world by building a small project: a simple Table Manager that will manage the salary data for some employees.
From a feature point of view, our app will be able to :
- render a list of employees in a table (an employee is made of a name & salary)
- add a new employee
- clear the list of employees
- calculate the total cost of salaries
- show how many employees earn more than 500$ per day
And maybe, the most important "feature" will be the fact that we will do everything by managing our app state with Mobx.
The basic setup of the project
We will start with the following basic setup. We just have some very basic components that mostly return some divs with some basic HTML tags.
The basic component architecture looks like this:
- App component
- Controls component
- Table component
- Row stateless component
Adding a store to our application
In this phase, our app is not fueled by any data. There are just some empty components. The initial data for our app will be an array of employee objects with a name and a daily salary
employeesList = [
    {name: "John Doe", salary: 150},
    //...
]
This data will have to be used in multiple components:
- in the Table (in order to list the employees)
- and in the Controls component, for adding a new employee or clearing the list
Given the fact that sending data and callbacks via props is not the most scalable solution for the core data of the app we could try to put together an appStore object that will encapsulate and manage this core data. This way, initially, we will have just to pass this appStore.
class Store {
  employeesList = [
    {name: "John Doe", salary: 150},
    {name: "Richard Roe", salary: 225},
  ]
}
const appStore = new Store()
Having the AppStore created we can send it now we can now send it to the main components:
<Controls store={appStore} />
<Table store={appStore} />
And now we can list the contacts in the Table component:
class Dashboard extends Component {
  render() {
    const {store} = this.props
    return <div className="dashboard">
      {store.contactsList.map((c, i) =>
        <Contact
          key={i}
          name={c.name}
          email={c.email}
        />
      )}
    </div>
  }
}
So far so good. However, if we try to add a new employee by pushing a new item into the appStore.employeesList or if we try to clear the list:
class Controls extends Component {
  addEmployee = ()=> {
    const name = prompt("The name:")
    const salary = prompt("The salary:")
    this.props.store.employeesList.push({name, email})
    // ERROR !!! this will not update the view
  }

  clearList = ()=> {
    this.props.store.employeesList = []
    // ERROR !!! this will not update the view
  }

  render() {
    return(<div className="controls">
      <button onClick=>clear table</button>
      <button>add record</button>
    </div>)
  }
}
We will not have any update of the view, even if things seem to work as they should:
You can also try to do a console log of the data and you will see that it all seems to be ok. The problem consists of the fact that React does not gets notified when the object was changed so it can start the rerendering.
Installing Mobx
Mobx deals with exactly these types of situations. It is a perfect tool for notifying React when things have changed in its data state.
But first, let's first add it to our application. The fastest way to install Mobx is by using NPM. Besides mobx we will also add mobx-react that we will use to glue together mobx and react.
So, open up a console and type:
npm install -save mobx mobx-reactWith the instalation complete we will add some new imports to our App.js:
import {decorate, observable} from "mobx"
import {observer} from "mobx-react"
Introducing the Mobx basics: observers - observables
Very in a nutshell mobx works on the observable - observer flow. You declare some data to be observable and when that data changes all the observers that are using that data will be notified.
In our example, the data that is changed is the employeesList. In mobx there are a few different alternatives to declare some data as observable. We will use the newest one, as it is, in my opinion, the most elegant and easy to use. It was added in Mobx4 and it is something like this:
class Store {
  //...
}

decorate(Store, {
  employeesList: observable
})

const appStore = new Store()
Now, to complete the flow, we will have to make the Table component to be an observer:
class Table extends Component {
  //...
}
Table = observer(Table)
And with these new changes we should have everthing working:
Using actions and configure-enforceActions in Mobx
Even though it all seems to be working ok we are breaking a very important rule of Mobx: state data should be modified only through actions. This will make the code more scalable and improve the data flow management.
Mobx even provides a mechanism for making sure this rule is respected. If we will add the following two lines to the app:
import {configure} from "mobx"
configure({enforceActions: true})
When we will press the clear employeesList button or when we will add a new employee, we will end up the this: Error: [mobx] Since strict-mode is enabled, changing observed observable values outside actions is not allowed:

This is happening because we are trying to change the state outside of a function. To fix this we will first have to import the action, add two new functions to the store and declare them as actions:
import {action} from "mobx"

class Store {
  //...
  clearList() {
    this.employeesList = []
  }

  pushEmployee(e) {
    this.employeesList.push(e)
  }
}

decorate(Store, {
  clearList: action,
  pushEmployee: action
})
Having the actions, we can now replace the unsafe data manipulation with the calls to these actions:
class Controls extends Component {
  addEmployee = ()=> {
    const name = prompt("The name:")
    const salary = parseInt(prompt("The salary:"), 10)
    this.props.store.pushEmployee({name, salary})
  }

  clearList = ()=> {
    this.props.store.clearList()
  }
  //...
}
By now everything should be back to normal and our data management is now completely encapsulated in the Mobx store:
So, to sum it up:
- where needed, make your data observable
- set observers to the components that are using the observable data
- only change observable via actions
I hope you like this tutorial, and if you would like to see more examples of Mobx or React you can always subscribe to my email list.
Using computed values in Mobx
Another core concept of Mobx is, the computed values. Basically, we can define computed values as data that is generated by doing calculations on the core data. You can see them as the data generated by formulas in Excel.
One perfect example could be the one of the total sum of individual salaries.

To create a computed value, we will import the computed concept and add a new property getter into the Mobx store. The new property will store the total sum of salaries.
import {computed} from "mobx"
class Store {
  //...
  get totalSum() {
    let sum = 0
    this.employeesList.map( e => sum = sum + e.salary)
    return sum
  }
}
decorate(Store, {
  //...
  totalSum: computed
})
Finally, we will just need to add a footer to our table and use the computed value.
class Table extends Component {
  render() {
    const {store} = this.props
    return(<table>
      //...
      <tfoot>
        <tr>
          <td>TOTAL:</td>
          <td>{store.totalSum}</td>
        </tr>
      </tfoot>
    </table>)
  }
}
This sum will also be updated when we clear or add to the employeesList.
A golden rule of Mobx is to store the minimum required amount of data and compute as much as possible. This will give you good performance and re-rendering speed.
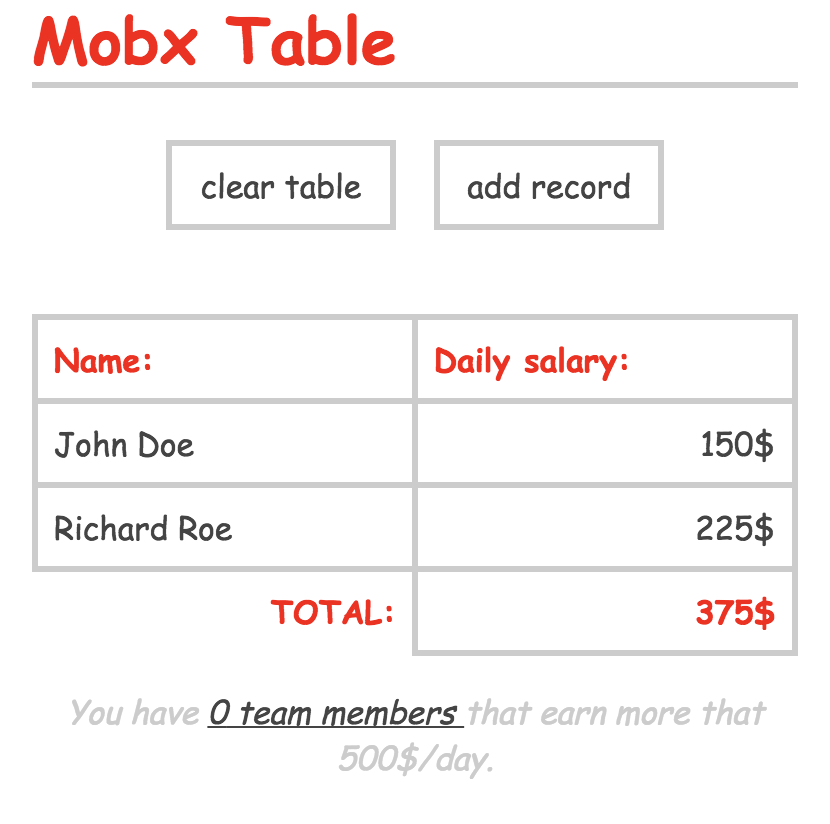
For example, another possible use case of Mobx computed values is counting & keeping track of how many records meet a specific condition. Let's say that we want to add an app footer where we will display the total number of the employees that earn more than 500$ per day.
Similar to the totalSum, also, in this case, we will add a computed value, only that now we will use the length of an array filter:
class Store {
  //...
  get highEarnersCount () {
    return this.employeesList.filter( e => e.salary > 500).length
  }
}
To display the result in the Table component we will add a new div:
class Table extends Component {
  render() {
    return (<div>
      //...
      <div className="fade">
        You have <u>{store.highEarnersCount} team members </u>that earn more that 500$/day.
      </div>
    </div>)
  }
}
This should be it. You can play with the full example in the below codesandbox:
I can't stress enough the importance of computed values in Mobx. They are very useful in a lot of scenarios. You can also see a great example in the egghead course of Michel Weststrate, the creator of Mobx.
There are a lot of Mobx features that were not covered in this tutorial. Things like providers, making HTTP calls or using Mobx with a router, just to name a few. But you've got the fundamentals by now: action -> observable -> observer -> React rerender. The Mobx docs are well-written and contain a lot of best practices.
📖 50 Javascript, React and NextJs Projects
Learn by doing with this FREE ebook! Not sure what to build? Dive in with 50 projects with project briefs and wireframes! Choose from 8 project categories and get started right away.
📖 50 Javascript, React and NextJs Projects
Learn by doing with this FREE ebook! Not sure what to build? Dive in with 50 projects with project briefs and wireframes! Choose from 8 project categories and get started right away.