Let's see how we can build a simple NextJs 13 app that supports a light-dark mode.
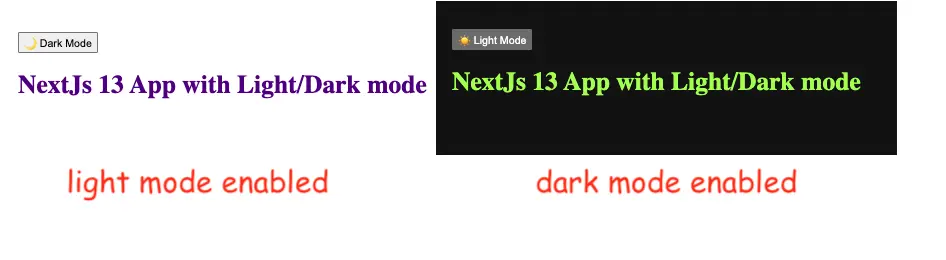
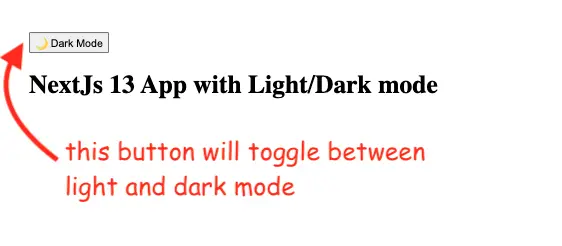
Below is what the app will look like. And if you want to skip ahead you can check out the full code on GitHub.
The next-themes library has become a default option for managing light-dark modes in NextJs. So, the first step will be to install this library:
npm i --save next-themesIn its essence, the next-themes library is a wrapper around the context API in NextJs. Using it we can build a UiContext that will manage the state of the light-dark mode:
// UiContext.js
'use client'
import { ThemeProvider } from 'next-themes'

export default function UiContext({ children }) {
  return <ThemeProvider attribute='class'>
    {children}
  </ThemeProvider>
}
The UiContext will need a way to toggle between the light and dark modes. For this, we will create a DarkLightSwitch component:
// DarkLightSwitch.js
'use client'

import { useEffect, useState } from 'react'
import { useTheme } from 'next-themes'

export default function DarkLightSwitch() {
  const { resolvedTheme, setTheme } = useTheme()

  const [mounted, setMounted] = useState(false)
  useEffect(() => setMounted(true), [])

  if (!mounted) {
    return null
  }

  return (
    <button
      aria-label='Toggle Dark Mode'
      type='button'
      onClick={() => setTheme(resolvedTheme === 'dark' ? 'light' : 'dark')}
    >
      {resolvedTheme === 'dark' ? '☀️ Light Mode' : '🌙 Dark Mode'}
    </button>
  )
}
The key elements here are the resolvedTheme and setTheme() properties that are provided by the useTheme() hook. They will automatically be connected to the ThemeProvider values.
Given that the DarkLightSwitch uses client-side hooks we will need to mark it as a client component.
Now that we have both the context and a dark-light switcher we can add them to the main layout of our NextJs app:
// layout.js
import './globals.css'
import UiContext from './UiContext'
import DarkLightSwitch from './DarkLightSwitch'

export default function RootLayout({ children }) {
  return (
    <html lang='en' suppressHydrationWarning>
      <body>
        <UiContext>
          <DarkLightSwitch />
          <main>{children}</main>
        </UiContext>
      </body>
    </html>
  )
}
And finally, we will just provide a simple page to play with:
export default function Home() {
return <h1>NextJs 13 App with Light/Dark mode</h1>
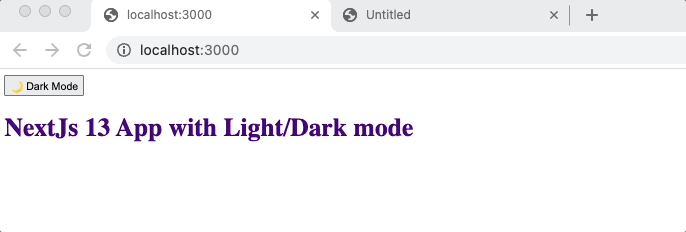
}At this point, the app should work as expected:
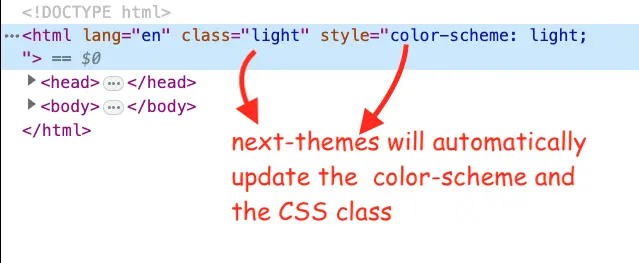
The ThemeProvider will make sure the color-scheme gets updated but manages a light/dark class that will be added to the html tag.
Using the light and dark CSS classes we can add some customization to the default colors for light or dark modes in the globals.css file.
/* globals.css */
.light { color: indigo; }
.dark { color: greenyellow;}
And this should give you a good start in implementing a simple light-dark mode in a NextJs app. Please feel free to add comments with questions you may have.
The full code of the example is on my GitHub. Cheers!
📖 50 Javascript, React and NextJs Projects
Learn by doing with this FREE ebook! Not sure what to build? Dive in with 50 projects with project briefs and wireframes! Choose from 8 project categories and get started right away.
📖 50 Javascript, React and NextJs Projects
Learn by doing with this FREE ebook! Not sure what to build? Dive in with 50 projects with project briefs and wireframes! Choose from 8 project categories and get started right away.