Please note that the instructions in this article are intended to be used while working with the new app folder introduced in NextJs 13.
Step 1: install the Font Awesome dependencies
After we create a brand new NextJs app go ahead and install the extra dependencies needed by Font Awesome:
npm install @fortawesome/fontawesome-svg-core @fortawesome/react-fontawesome @fortawesome/free-solid-svg-icons These are the bare minimum libraries needed to get started. We may need to import some other libs based on the icon collections we need in our project. See more about this here.
Step 2: importing the Font Awesome core styles and config
Next, create a layout.js file in the app folder with the following content:
// app/layout.js
import "@fortawesome/fontawesome-svg-core/styles.css";
import { config } from "@fortawesome/fontawesome-svg-core";
config.autoAddCss = false;

export default function RootLayout({ children }) {
  return (
    <html>
      <head />
      <body>{children}</body>
    </html>
  )
}
Given that these files are common a layout file makes a perfect place for importing them.
Step 3: use Font Awesome icons in pages or components
With this setup in place, we can now start using the Font Awesome icons in any individual components or pages we need.
For example, this code:
import { FontAwesomeIcon } from "@fortawesome/react-fontawesome";
import {
  faMagnifyingGlass,
  faCircleStop
} from "@fortawesome/free-solid-svg-icons";

export default function Page() {
  return <>
    <div>
      <FontAwesomeIcon
        icon={faMagnifyingGlass}
      />
      <FontAwesomeIcon
        icon={faCircleStop}
      />
    </div>
  </>
}
Will produce the following output:
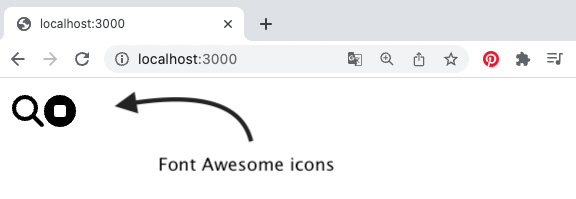
Note that if we would not import the core styles and config in the layout file, the icons would go 100% of the width of the page.
Adding extra styles to Font Awesome icons
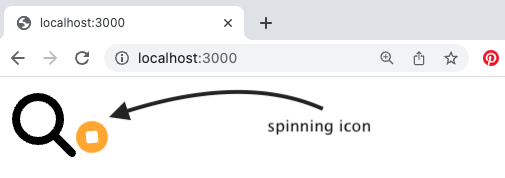
We can add extra properties to the <FontAwesomeIcon/> component in order to customize the icons:
<FontAwesomeIcon
        icon={faMagnifyingGlass}
        size="2x"
/>
<FontAwesomeIcon
        style={{color: "orange" }}
        icon={faCircleStop}
    spin
/>
Adding Extra attributes such as style, size or spin will produce these effects:
You can see here a full list of these properties.
How to choose the icons
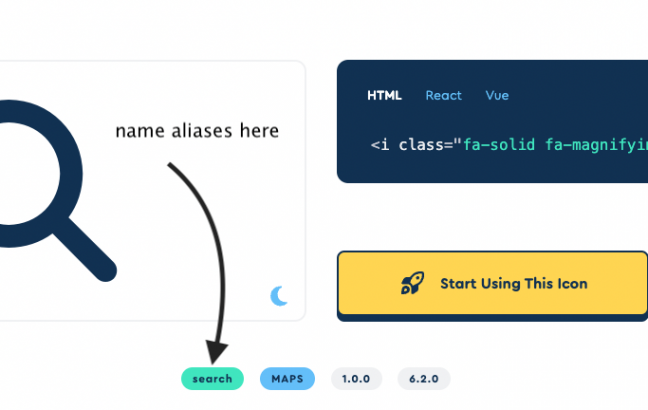
You can see the see free available icons definitions in the following file:
/node_modules/@fortawesome/free-solid-svg-icons/index.d.tsThe Fontawesome site has a great search tool for all the available icons: https://fontawesome.com/icons
Keep in mind that each icon can have one or multiple aliases. So for example, the faMagnifyingGlass is the same as faSearch. Just check for the aliases in the search tool:
Finally, please note that you may need to install some extra dependencies if you will need icons from other packages or styles.
For example:
npm install @fortawesome/free-brands-svg-iconsSee more about extra packages in this Digital Ocean article.
Using the pro version of Font Awesome
Font Awesome comes both with the free and the paid pro version. The example in this tutorial was done with free icons, but the steps are the same if you want to use the pro version.
Extra resources
Some extra useful links:
- the official site of fontawesome
- this article about how to use Font Awesome with React
- using the alternative React Icons with NextJs app folder
- and speaking about fonts in NextJs: Using Google Fonts in NextJs 13
📖 50 Javascript, React and NextJs Projects
Learn by doing with this FREE ebook! Not sure what to build? Dive in with 50 projects with project briefs and wireframes! Choose from 8 project categories and get started right away.
📖 50 Javascript, React and NextJs Projects
Learn by doing with this FREE ebook! Not sure what to build? Dive in with 50 projects with project briefs and wireframes! Choose from 8 project categories and get started right away.